

Key Takeaways
- Simple aging-in-place design features like zero-threshold showers and lever-style handles can prevent falls and preserve independence for years.
- Starting modifications in your 50s or early 60s saves thousands compared to emergency renovations after an injury or health event.
- Universal design isn't about making your home look clinical—modern options blend seamlessly with any décor style.
- A phased approach to home modifications lets you spread costs over time while prioritizing the highest-impact safety upgrades first.
The Phone Call That Changed Everything
Last September, I got a call from a woman named Linda in suburban Atlanta. She was 67, recently retired, and calling from a hospital room. Her husband, Tom, had slipped stepping out of their bathtub—the same cast-iron tub they’d had for 28 years. He fractured his hip. Surgery went well, but the real crisis came when the discharge coordinator asked a question Linda hadn’t considered: “Is your home safe for him to come back to?”
Their split-level had stairs at every turn. Narrow hallways. Round doorknobs Tom couldn’t grip with his weakened hand. A bathroom too small for a walker. In the span of 72 hours, Linda had to arrange emergency renovations costing over $14,000—work that would have cost a fraction of that if they’d planned ahead.
In my 14 years as a Certified Aging-in-Place Specialist, I’ve heard some version of Linda and Tom’s story hundreds of times. And the heartbreaking part is that almost every one of these emergencies was preventable. The aging-in-place design features every homeowner should know aren’t complicated, they aren’t ugly, and most of them aren’t even expensive—if you act before the crisis hits.
Why “Someday” Thinking Costs You More Than Money
Here’s a number that should stop you in your tracks: according to the National Council on Aging, falls are the leading cause of fatal and non-fatal injuries among adults 65 and older, and one in four older Americans falls every year. The average hospital cost for a fall-related hip fracture exceeds $30,000. Compare that to the $300 it costs to install a set of grab bars, or the $2,500 for a curbless shower renovation.
What I see most often is a couple in their early 60s who love their home, plan to stay forever, but keep pushing modifications to “next year.” Then something happens—a fall, a diagnosis, a spouse’s sudden mobility change—and “next year” becomes “right now” at triple the cost and ten times the stress.
The data backs this up. AARP’s 2024 Home and Community Preferences Survey found that 77% of adults age 50 and older want to remain in their current home as they age. But fewer than half have made even a single modification to support that goal. That gap between intention and action is where injuries happen, independence is lost, and savings disappear. If you’re serious about protecting your nest egg, you might also want to review these eight steps to protect your retirement savings from unexpected expenses like emergency renovations.
The Room-by-Room Breakdown: Where to Start
When clients ask me where to begin, I don’t hand them a 47-page checklist. I walk through their home the way an occupational therapist would, looking for the spots where daily life could become dangerous. Let me walk you through the same process.
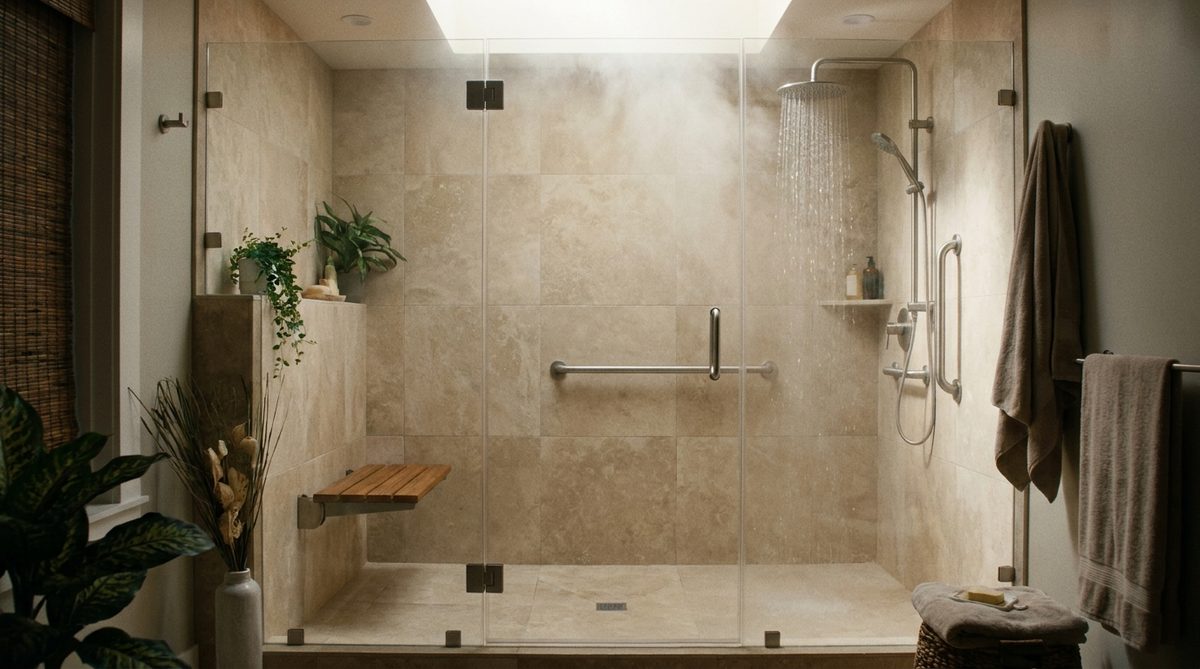
The Bathroom: Ground Zero for Falls
I tell every client the same thing: if you only modify one room, make it this one. Wet, slippery, hard surfaces combined with the physical movements of bathing make the bathroom the most hazardous room in the house for adults over 50.
The single most impactful upgrade is a zero-threshold (curbless) shower. Eliminating that 4- to 6-inch lip removes the most common trip point. Modern curbless showers use linear drains and gentle floor slopes—they look like something out of a luxury hotel, not a medical facility.
Add grab bars near the toilet and inside the shower. Today’s options come in matte black, brushed gold, and oil-rubbed bronze. They look like towel bars. Nobody walking into your bathroom will think “medical equipment.” Also consider a comfort-height toilet (17 to 19 inches versus the standard 15), a handheld showerhead on an adjustable slide bar, and non-slip flooring—textured porcelain tile rated for wet areas works beautifully.
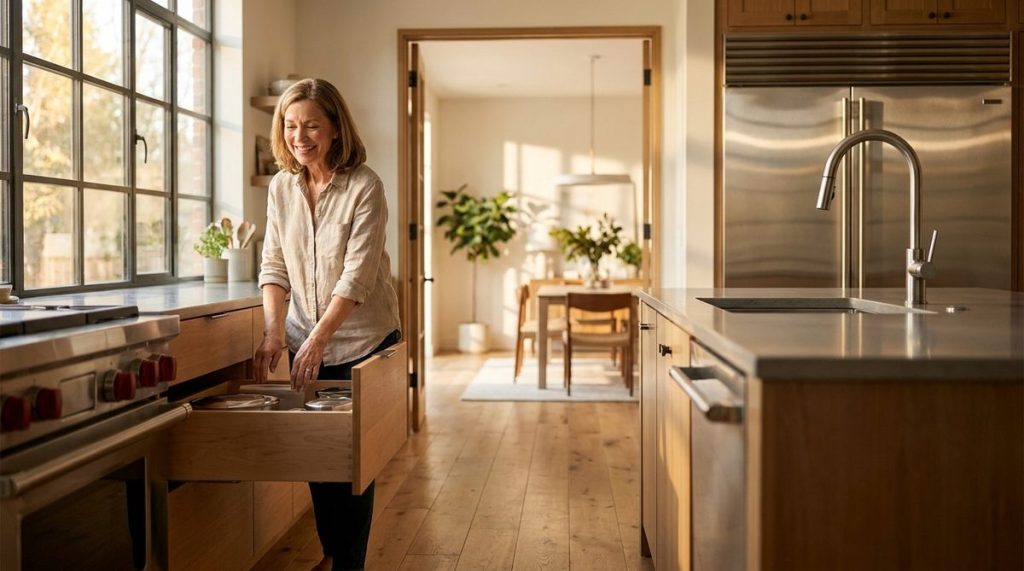
The Kitchen: Small Changes, Major Independence
Kitchens are where independence lives. If you can feed yourself comfortably, you can stay in your home. The biggest issues I see are overhead cabinets that require stretching or step stools, and base cabinets that demand bending and kneeling.
Pull-down shelving systems for upper cabinets cost between $200 and $500 per unit and bring everything to counter level. Pull-out drawers retrofitted into lower cabinets eliminate the need to crouch and reach into the back of a dark shelf. Lever-style faucet handles replace round knobs that become impossible to grip with arthritic hands.
Good task lighting matters more than most people realize. Under-cabinet LED strips (around $40 to $80) reduce eye strain and help you see knife edges, burner flames, and expiration dates clearly. For a deeper dive into technology that supports independent living, check out this aging-in-place tech guide for setting up your smart home safely.
Entryways and Hallways: The Forgotten Danger Zones
I often tell my clients that doorways and hallways are the circulatory system of a home. If they’re blocked, narrow, or poorly lit, everything else becomes harder.
Standard interior doorways are 28 to 30 inches wide. A wheelchair needs 32 inches minimum; 36 is ideal. You don’t need to reframe every opening—offset hinges (also called swing-clear hinges) add about 2 inches of clearance for under $20 per door. Replace round doorknobs with lever handles, which can be operated with a closed fist or an elbow.
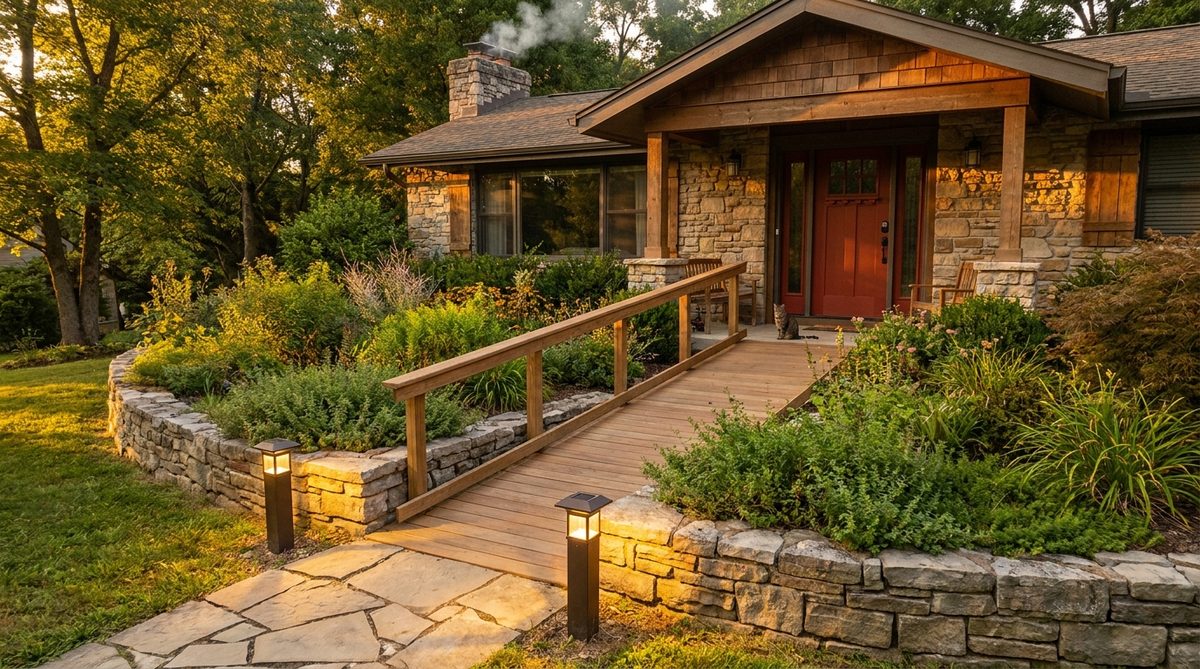
At the front entrance, consider whether you could install a no-step entry. A gently graded ramp with a 1:12 slope (one inch of rise per 12 inches of run) can be integrated into landscaping so it looks intentional, not institutional. Motion-activated exterior lighting eliminates fumbling for keys in the dark.
The Bedroom: Preparing for Reduced Mobility
If your only bedroom is on the second floor, this is the conversation you don’t want to have—but need to. Stairs become the number-one reason people are forced to leave homes they love. The National Institute on Aging recommends that older adults have a bedroom, full bathroom, and kitchen all on the same level.
If a main-floor bedroom isn’t currently an option, consider converting a den or formal dining room. You’d be surprised how a room you rarely use can become the room that lets you stay home for another 20 years. At minimum, ensure you have a light switch within reach of the bed, nightlights along the path to the bathroom, and enough space on both sides of the bed for a walker or wheelchair to pass through.
What These Modifications Actually Cost
One of the biggest myths I encounter—and I debunk more of them in this article on aging-in-place myths—is that making a home aging-friendly requires a complete gut renovation. It doesn’t. Here’s a realistic breakdown:
| Modification | Estimated Cost | DIY Possible? | Impact Level |
|---|---|---|---|
| Grab bars (per set of 3) | $150–$400 installed | Yes, with proper blocking | High |
| Lever door handles (per door) | $20–$50 | Yes | Medium |
| Comfort-height toilet | $250–$500 installed | Moderate skill needed | High |
| Curbless shower conversion | $2,500–$7,500 | No—hire a pro | Very High |
| Offset (swing-clear) hinges | $15–$25 per door | Yes | Medium |
| Under-cabinet LED lighting | $40–$80 per strip | Yes | Medium |
| Pull-out cabinet drawers (per unit) | $100–$300 | Yes, with basic tools | Medium |
| Front-entry ramp (wood or composite) | $1,500–$4,000 | No—hire a pro | Very High |
| Stairlift (straight staircase) | $3,000–$5,500 | No—hire a pro | Very High |
| Smart home voice-activated controls | $100–$500 | Yes | Medium-High |
Notice that many high-impact modifications cost less than a weekend getaway. The items under $500 can often be completed in a single afternoon. Even the larger projects—curbless showers, ramps, stairlifts—are a fraction of what a single year in assisted living costs (the national median is $64,200 annually, according to Genworth’s 2024 Cost of Care Survey).
A Phased Plan: How to Prioritize Without Overwhelm
You don’t need to do everything at once. In fact, I recommend a phased approach that spreads costs and lets you tackle the most dangerous areas first. Here’s the action plan I give to most of my clients:
- Conduct a home safety walkthrough. Walk through every room with fresh eyes. Note trip hazards (loose rugs, raised thresholds, cords across walkways), poor lighting, and areas where you brace yourself against a wall or furniture for balance.
- Address the bathroom within the first 30 days. Install grab bars, add non-slip mats or textured adhesive strips, and replace round faucet knobs with lever handles. Total cost: under $500.
- Improve lighting throughout the home within 60 days. Add motion-sensor nightlights in hallways, the bathroom, and the bedroom. Install brighter LED bulbs in the kitchen, stairways, and garage entry. Budget: $100–$200.
- Swap out hardware in months two through three. Replace round doorknobs with levers. Install offset hinges on bathroom and bedroom doors. Secure loose area rugs with double-sided carpet tape or remove them entirely.
- Plan the bigger projects for months three through twelve. Schedule a curbless shower installation, evaluate whether you need a main-floor bedroom conversion, and get estimates for a no-step entry if your front door has stairs.
- Add smart-home technology. Voice-activated lighting, smart locks, video doorbells, and medical alert integrations can all be layered in as your comfort with technology grows.
- Schedule an annual reassessment. Your needs will evolve. What works at 62 may not work at 75. Revisit your setup every year, ideally with an occupational therapist or a CAPS professional.
Universal Design: It’s Not What You Think It Looks Like
I need to address the elephant in the room, because I hear it constantly: “I don’t want my home to look like a hospital.” I get it. And you don’t have to settle for that.
Universal design—the philosophy behind aging-in-place features—was never meant to be clinical. It was developed in the 1990s by architect Ronald Mace at North Carolina State University, and the core idea is simple: design spaces that work for the widest range of people possible, regardless of age, size, or ability. A curbless shower isn’t a medical device; it’s a design trend in luxury homes across the country. Lever handles are standard in modern architecture. Wider doorways make any home feel more open and inviting.
Better Homes & Gardens featured universal design elements in their 2024 home trends roundup, noting that these features increase resale value because they appeal to buyers of all ages. So you’re not just investing in your own safety—you’re investing in your home’s marketability.
The Bigger Picture: Your Home as a Health Strategy
Aging-in-place design features are about more than preventing falls. They’re about preserving the life you’ve built. Every modification that keeps you safely at home is a modification that keeps you in your community, near your neighbors, close to your routines. Research consistently shows that older adults who remain in familiar environments experience lower rates of depression, better cognitive function, and stronger social connections.
This connects to a broader lifestyle approach. If you’re working on building healthier habits as you age, the six pillars of a healthier, age-defying lifestyle for 2026 offer a solid framework that goes beyond just the physical home.
There’s also an environmental angle that surprised even me when I first dug into the data. Staying in your existing home rather than moving into new construction or a large senior living facility carries a significantly smaller carbon footprint. You’re not consuming new materials, not contributing to sprawl, and not adding to the energy demands of a commercial building. Your home, properly modified, is one of the greenest choices you can make in your later decades.
What I’d Tell Linda If I Could Go Back in Time
Linda and Tom are doing fine now. Their home has been modified—grab bars in every bathroom, a stairlift, a walk-in shower, wider doorways on the main floor. Tom is back on his feet with a cane. But Linda told me something on our last call that stuck with me: “We spent 30 years maintaining our roof, our furnace, our driveway. We never once thought about maintaining the home for us.”
That’s the shift I’m asking you to make. Your home is your greatest asset—not just financially, but as the place where your independence lives. The aging-in-place design features every homeowner should know aren’t luxuries reserved for later. They’re maintenance. They’re prevention. They’re the reason you get to wake up tomorrow in the home you love, pour your coffee in your own kitchen, and walk safely to your own front door.
Start with the bathroom. Start with a grab bar. Start with a single lever handle on the door you use most. Just start. Because the best time to future-proof your home was ten years ago. The second-best time is this weekend.
About Marcus Bell, Certified Aging-in-Place Specialist (CAPS)
Marcus Bell is a Certified Aging-in-Place Specialist (CAPS) with 14 years of experience helping American seniors create safer, more comfortable living environments. He has consulted on hundreds of home modifications — from bathroom safety upgrades to smart home installations — and writes extensively about the products, services, and strategies that help older adults live independently for longer. At Daily Trends Now, Marcus covers home improvement, aging-in-place solutions, gardening, and practical lifestyle tips for seniors.